请注意,本文编写于 437 天前,最后修改于 123 天前,其中某些信息可能已经过时。
目录
介绍
在Web应用中,对部分资源进行访问控制是是否常见的需求,Nginx的http auth模块以及Apache http auth都是很好的解决方案。
默认情况下nginx已经安装了ngx_http_auth_basic_module模块,支持基于用户名和密码的基本认证。
基本配置
nginxlocation /admin/ {
    auth_basic "Admin Area";                   # 认证提示字符串(realm)
    auth_basic_user_file /etc/nginx/.htpasswd; # 密码文件路径
}
前提
已安装Docker和Docker Compose
一、创建项目目录结构
首先,创建一个项目目录并进入:
bashmkdir nginx-auth-basic && cd nginx-auth-basic
二、创建 Docker Compose 文件
创建docker-compose.yml文件:
yamlversion: '3.8'

services:
  nginx:
    image: nginx:latest
    container_name: nginx_auth_basic
    ports:
      - "80:80"
    volumes:
      - ./html:/usr/share/nginx/html             # 静态文件目录
      - ./conf/nginx.conf:/etc/nginx/nginx.conf  # 主配置文件(注意路径末尾无斜杠)
      - ./conf/conf.d:/etc/nginx/conf.d          # 子配置目录
      - ./logs:/var/log/nginx                    # 日志目录
      - ./htpasswd:/etc/nginx/htpasswd           # 密码认证
    restart: always
三、创建 Nginx 配置文件
创建nginx.conf文件:
nginxuser  nginx;
worker_processes  auto;

error_log  /var/log/nginx/error.log warn;
pid        /var/run/nginx.pid;

events {
    worker_connections  1024;
}

http {
    include       /etc/nginx/mime.types;
    default_type  application/octet-stream;

    log_format  main  '$remote_addr - $remote_user [$time_local] "$request" '
                      '$status $body_bytes_sent "$http_referer" '
                      '"$http_user_agent" "$http_x_forwarded_for"';

    access_log  /var/log/nginx/access.log  main;

    sendfile        on;
    keepalive_timeout  65;

    include /etc/nginx/conf.d/*.conf;
}
创建conf.d/default.conf文件:
nginxserver {
    listen 80;
    server_name localhost;

    location / {
        # 关键配置
        auth_basic "Restricted Area";
        auth_basic_user_file /etc/nginx/htpasswd/.htpasswd;

        root /usr/share/nginx/html;
        index index.html index.htm;
    }
}
四、创建密码文件
使用htpasswd工具创建认证文件。
- 安装htpasswd工具:
bashsudo yum install httpd -y
- 创建密码文件:
bashmkdir -p htpasswd
htpasswd -c ./htpasswd/.htpasswd username
- 系统会提示输入密码,如下图所示即是添加用户和密码成功
 这一步完成后可以启动服务并测试
 - 添加更多用户
bash# 添加用户
echo -n 'test:' >> ./htpasswd/.htpasswd
# 设置密码
openssl passwd 111111 >> ./htpasswd/.htpasswd
- 查看
bashcat ./htpasswd/.htpasswd
五、启动服务
运行以下命令启动Nginx容器:
bashdocker-compose up -d
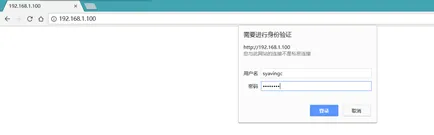
六、测试配置
访问ngxin页面,会看到一个登录提示框,输入设置的用户名和密码才能访问页面:
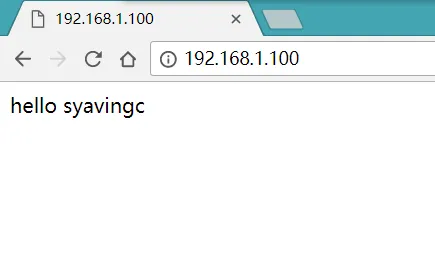
 登录之后
登录之后
七、其他配置选项
排除某些路径不需要认证
nginxlocation /public {
    root /usr/share/nginx/html;
    index index.html index.htm;
}

location /private {
    auth_basic "Restricted Area";
    auth_basic_user_file /etc/nginx/htpasswd/.htpasswd;
    root /usr/share/nginx/html;
    index index.html index.htm;
}
使用不同的认证文件
nginxlocation /admin {
    auth_basic "Admin Area";
    auth_basic_user_file /etc/nginx/htpasswd-admin/.htpasswd;
}

location /users {
    auth_basic "User Area";
    auth_basic_user_file /etc/nginx/htpasswd-users/.htpasswd;
}
本文作者:哈希喵
本文链接:
版权声明:本博客所有文章除特别声明外,均采用 BY-NC-SA 许可协议。转载请注明出处!
目录